Overlaying Shaped And Clickthrough Windows application allows rapid creation of windows which can be shaped any way you want and which can host images, texts and other functionalities such as making the windows clickthrough-able or to behave in a certain way.
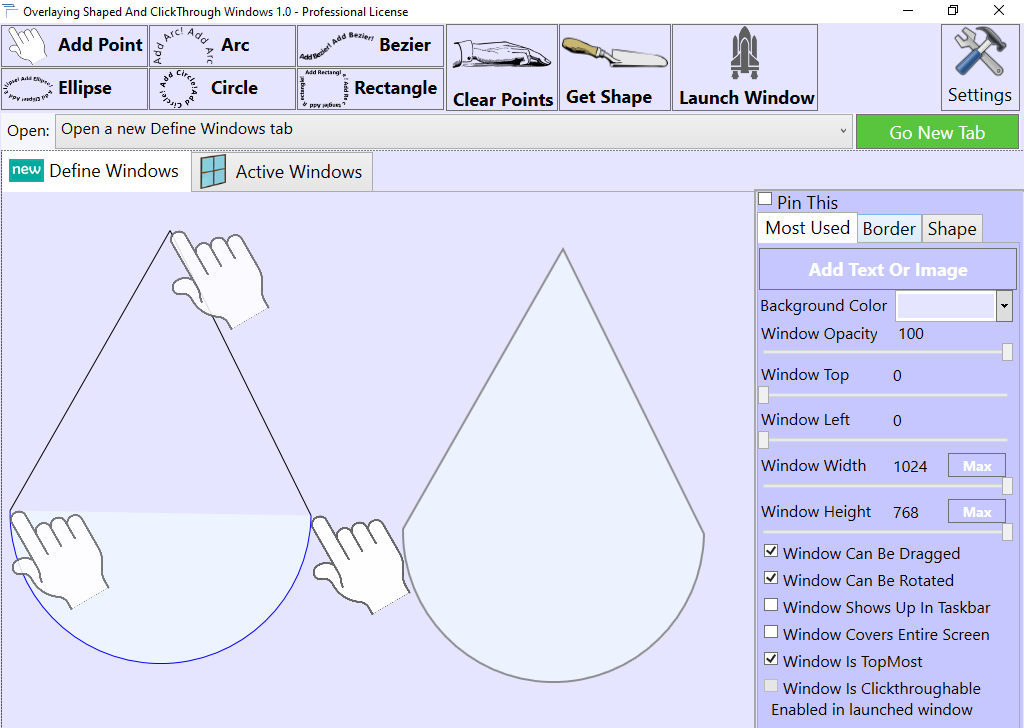
While defining the window you can create shapes which will either be the actual background of the window or will be actual shapes which you can drag on that window after it is launched. Using the sidebar to the left you can specify the window properties before launching it. You can add images, text and shapes to the window while you define it and anything you add on the window while you define it will be copied/duplicated in the window itself when you launch it by pressing the Launch Window button, notice the Launch button in the top menu.
Using this application you can do the following:
create overlaying, shaped and clickthrough windows
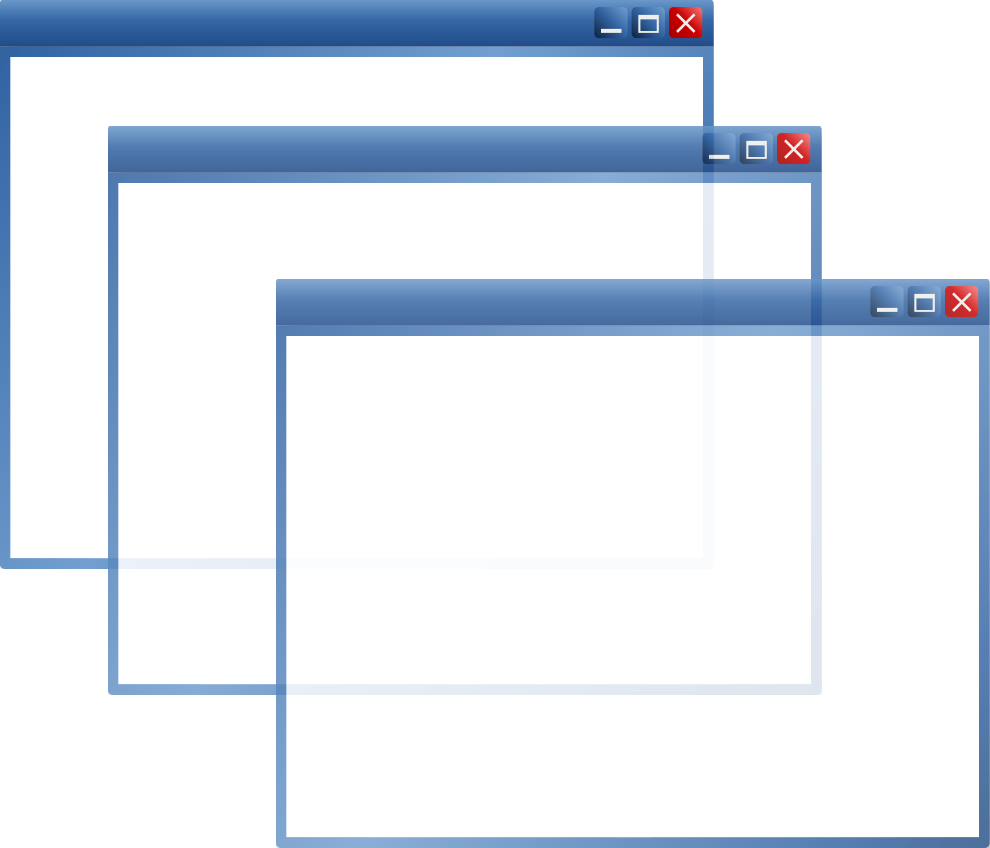
create transparent windows overlaying them one on top of the other
create windows based on your own created shapes
create shapes from lines, arc, ellipses, circles, rectangles or Bezier curves
build a window entirely from an image with transparency (car, tree, planet, etc) launch the window and see only that object (be it a car, tree, planet) with preserved transparency
build windows using border width, border padding and border corner radiuses
drag, rotate and resize windows
specify whether the created/launched windows are showing up or not in the Taskbar
specify whether the created/launched windows are Topmost or not
specify whether the created/launched windows are clickthrough-able or not
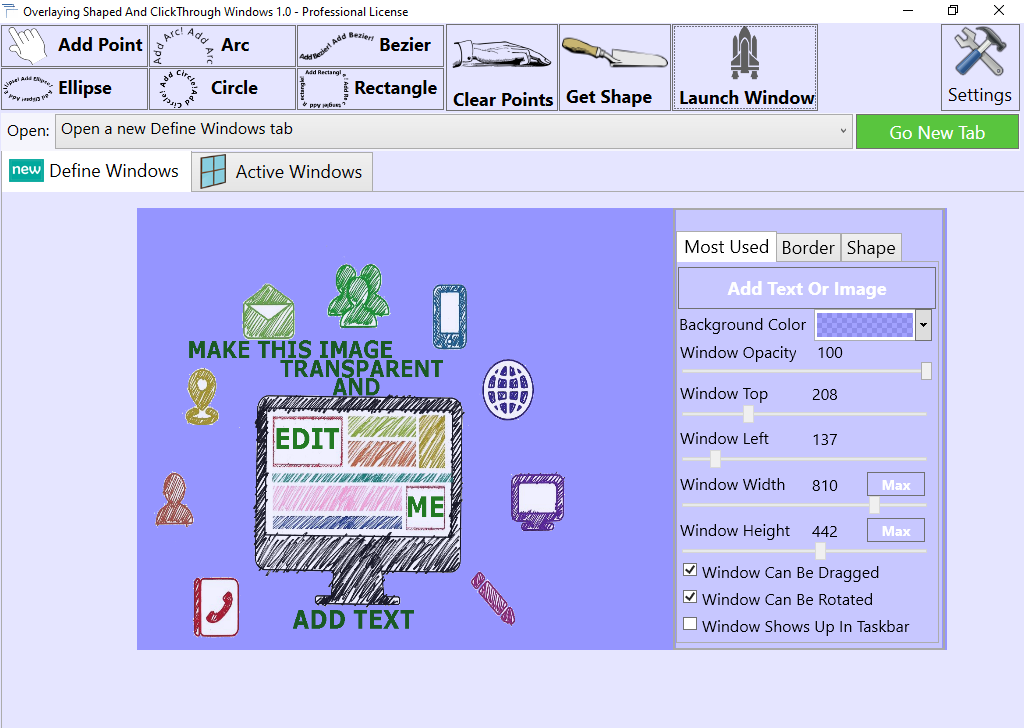
add images (just drop them on the canvas)
edit those images so that only the text will be shown instead of the image. Or you can show both the image and the text. When you edit the text associated to the image, you can set several properties for that text such as text color, text size, text weight (such as Bold) and the font family
aside from working with texts, you can also work with any number of images on the canvas by resizing, rotating, duplicating, deleting and changing the opacity of those images. This way you could create a final image from multiple individual images
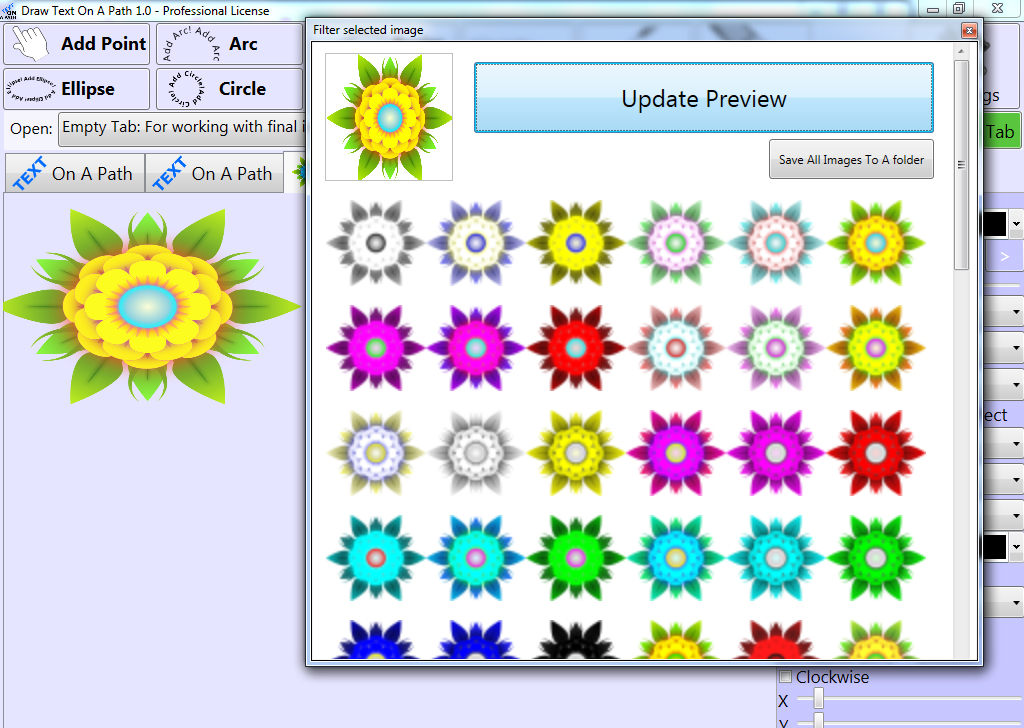
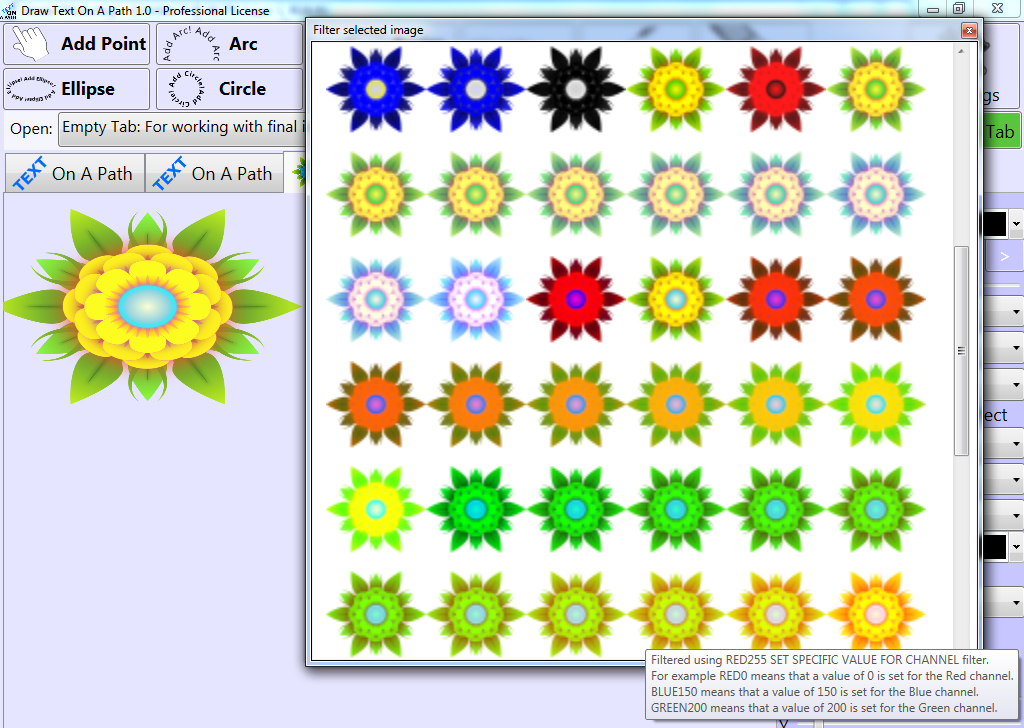
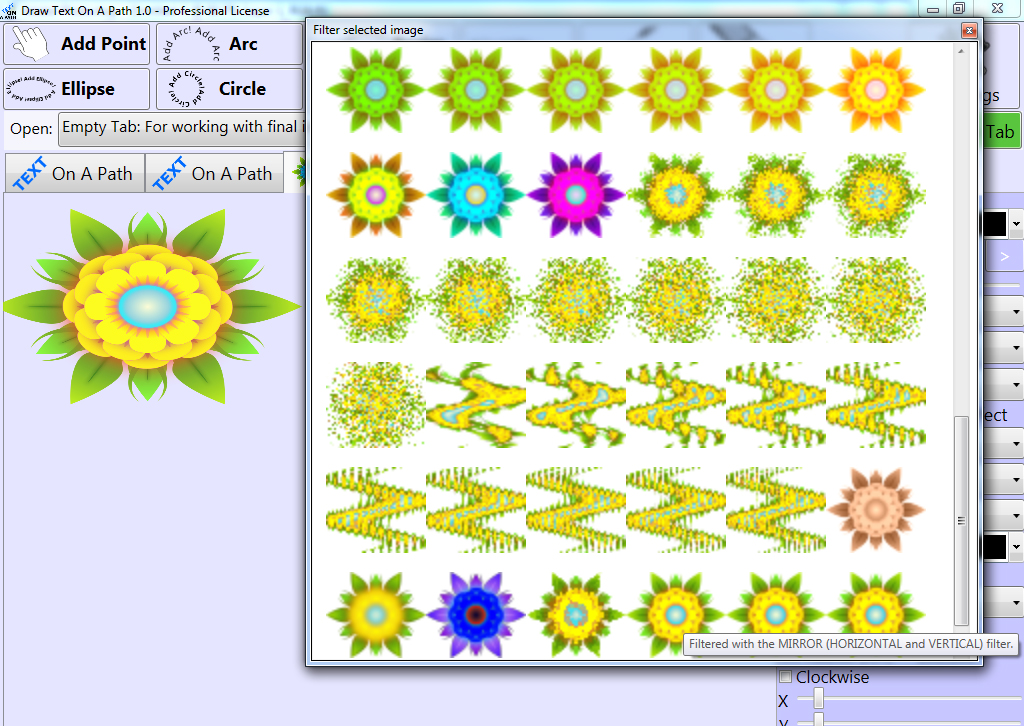
select any image and filter it using 94 filter variations
create a path made of points for which you can then get the coordinates
You can define shapes using one of the following:
points
arcs
circles
ellipses
rectangles
beziers
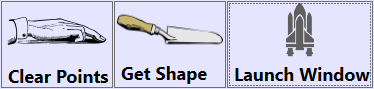
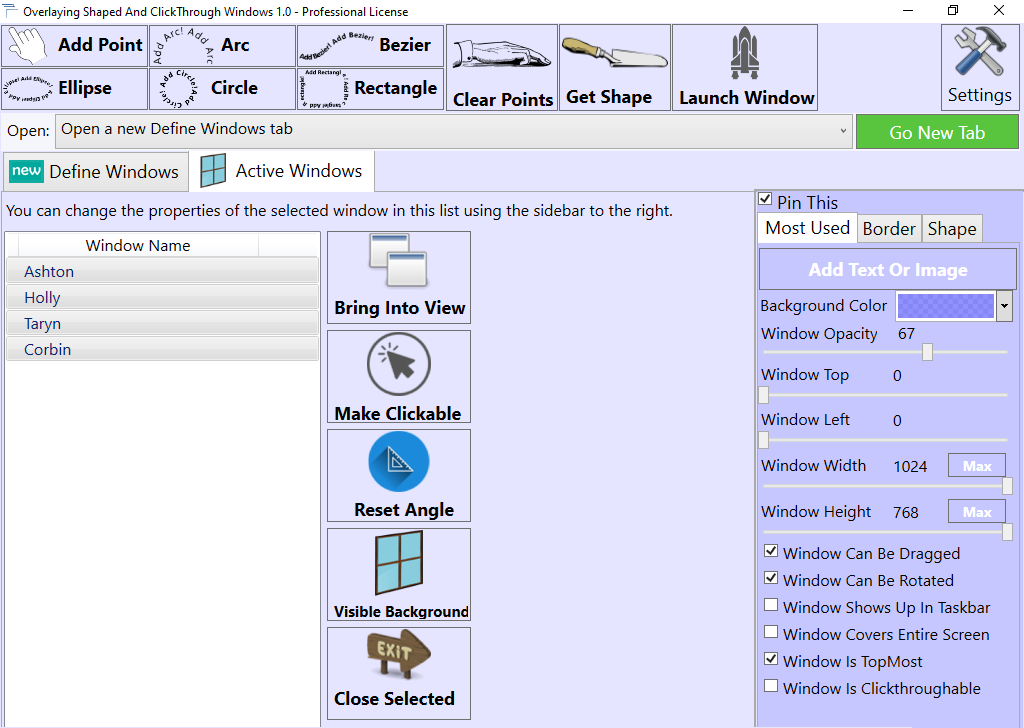
Notice the buttons below which you can find in the top left menu of the application window
To start defining a window, click on the Define Windows tab, set the properties of that window using the sidebar to the right. While defining it, you can also can create shapes using the top buttons, add images to the canvas and edit those images and then when you are done defining the window you can press the Launch Window button from the top menu. That will create a window having the characteristics you defined in the Define Windows tab.
While defining the window you may want to add an image to the canvas (in the Define Windows tab), here are the functionalities you can do on the added image in that tab:
You can then:
duplicate that image just by double clicking it. The actual points/hands cannot be duplicated
resizing that image by pressing one of the CTRL keys and then grabbing the image with the mouse and dragging the mouse, as you drag the mouse, the size of the image will be updated based on the direction of where the mouse is moving
rotating that image by pressing one of the SHIFT keys and then clicking the image. If you press the LEFT SHIFT key and click the image, the image will rotate to the left. Similarly, if you press the RIGHT SHIFT key and click the image, the image will rotate to the right
filtering the image using several image filters. Notice the Quick Filters menu option when you right click the image
change the opacity of the image by pressing LEFT CTRL key + A (lowers opacity of the selected image) or LEFT CTRL key + Q (increases opacity of the selected image)
moving the image using the: W, A, S, D key (before moving the image using these keys, you have to click on the image first, to select it)
deleting the image just by pressing the DEL button on your keyboard
After you have launched a window, you can still set its properties using that window’s side bar and you can still add images and texts to it and even a background image. You can still add items to that window and set its properties just like you did in the Define Windows tab, except now you’re doing it while the window is launched.
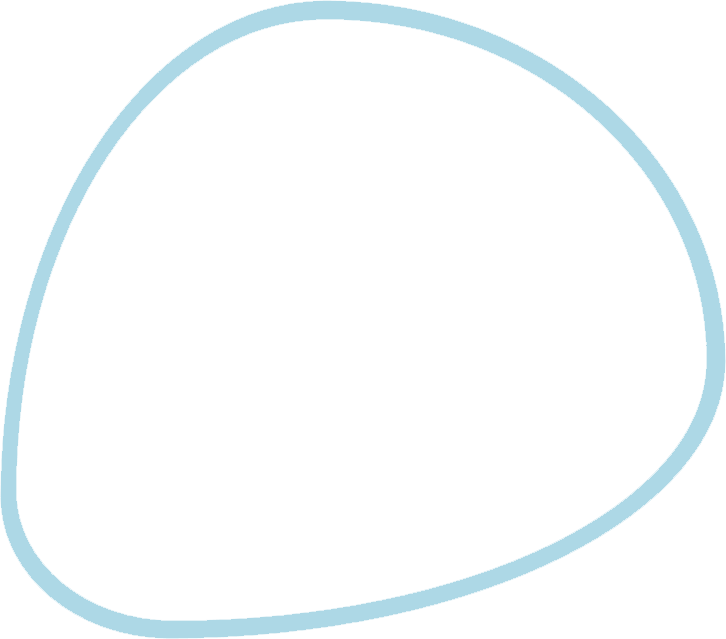
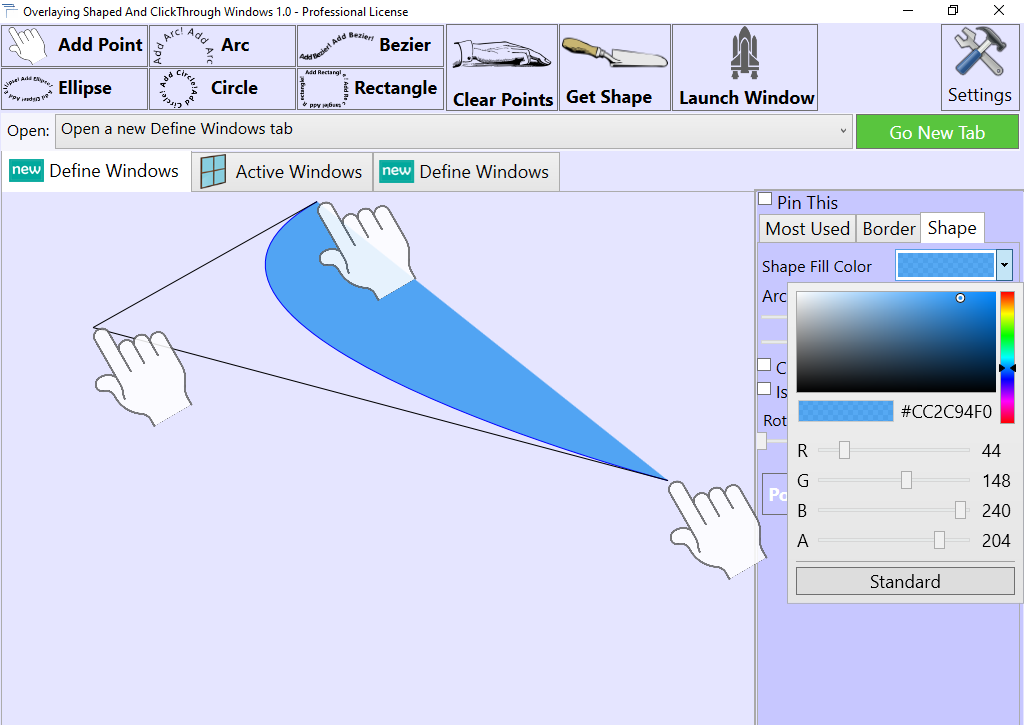
Here is an example of a shape you can create using this app. The shapes you build on the Define Windows canvas, can then be the background of the window or can be elements (besides images and text) present on the window itself:
Overlaying Shaped And Clickthrough Windows runs on Windows 7, 8/8.1, 10 and 11 - both 32 and 64 bits
You may download the feature limited trial, and evaluate the software for as long as you need
.Net Framework 4.0 or higher required
The software is licensed per computer
Free lifetime upgrades
This is a lifetime use license. This means you can use the application for any amount of time after you have purchased it
Free technical support via email
The registration code will be sent by e-mail after your purchase is confirmed
Imagine having an image with transparency of a car or of a tree or of a planet or anything else you can think of and then having the ability to create a window with transparency based on that image, the only thing you will see after launching that window will be that item (whether it is a car, a tree or a planet) with preserved transparency directly on your Windows Desktop.
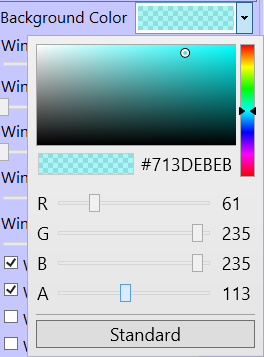
Here is an example of how to do this: add an image with transparency to the canvas in the Define Windows tab. The easiest way to add such an image is to go to the side bar of the Define Windows tab and press the Add Text Or Image button, that will add the default image of the application to the canvas. Then still in the side bar of that tab make the Background color to have the Alpha channel set to 0, just click the background color underneath the button and drag the slider associated with the Alpha channel, it’s that easy, then press the Launch Window button from the top menu. That will create a new window showing only that image you added (with preserved transparency), that window will have the background invisible because you set the Alpha channel of its background color to 0. Now you can move that image across the screen just grab it with the mouse and move it, you can rotate it and you can resize it, please read below on how to do all these:
So you can drag the window/object/image around the screen you can rotate and resize that window/object/image directly on your Windows Desktop. To drag it you just click it and move the mouse, when you’re done just release the mouse.
To rotate it use LEFT CTRL + LEFT SHIFT + click the mouse once on that window, that will rotate it to the LEFT. To rotate it to the right you can press RIGHT CTRL + RIGHT SHIFT + click the mouse once.
To resize the window, you can press CTRL + click and drag the mouse and then once you obtained the desired width/height for the image you can release the mouse and the window will have the width/height at the moment you released the mouse.
Then again imagine being able to make transparent windows having either the desired color as the background or having an image as the background. You can then overlay these windows on the screen in the order you want, that way you can obtain different color variations through which you can view and even work on the Windows Desktop. You can actually work on the Windows Desktop with those windows overlaid after making the windows clickthrough-able and have a certain (higher) degree of transparency so that it allows you to see what is underneath those windows.
The transparency of a window can be set in two ways:
you can either directly use the opacity slider in the sidebar of that window
or
you can set a transparent background color for that window, in the sidebar.
You can also set the opacity and set a transparent background in the same time if you want to.
The same goes for the clickthrough function of a window, specifically there is a check box in the sidebar which controls whether a window is clickthrough-able. To switch states (whether a window is clickthrough-able or not) you simply check or uncheck that check box. There is also a menu option for this when you right click the window after it has been launched.
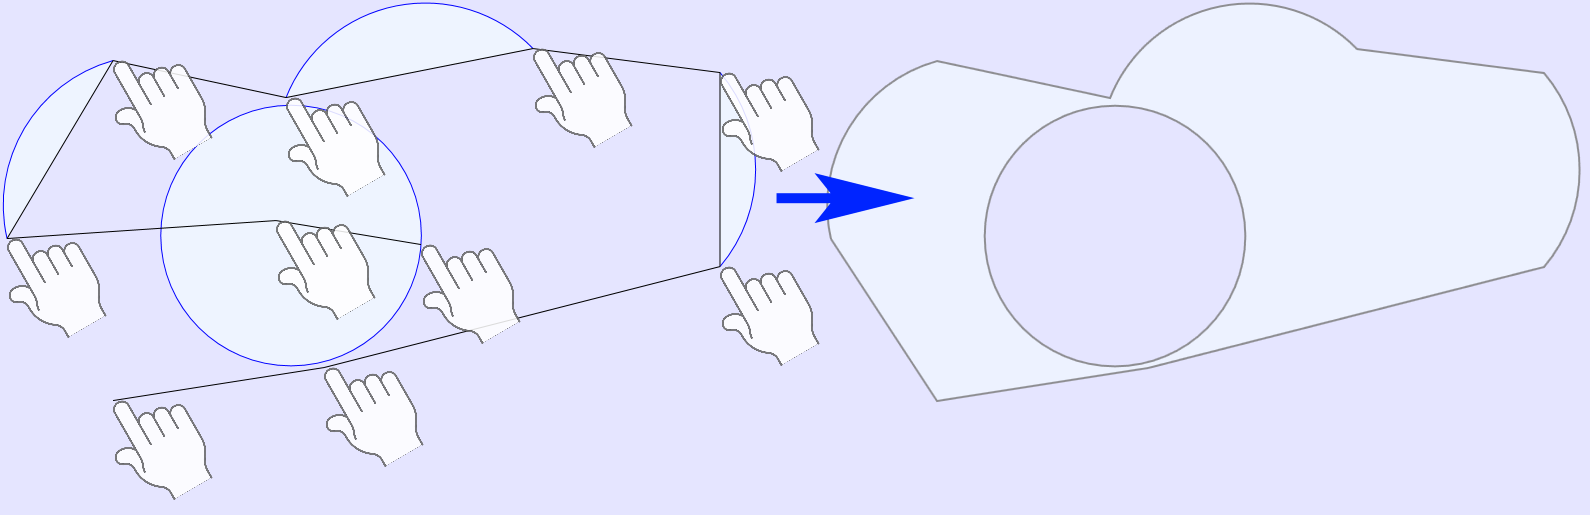
Then imagine being able to create a shape using lines, arcs, rectangles, ellipses, circles, Bezier curves and then being able to create a window based on that specific shape you created, the window (after it is launched) will be the shape itself. This is possible using this application. The application also features the functionality of copying the coordinates of the points added to the canvas.
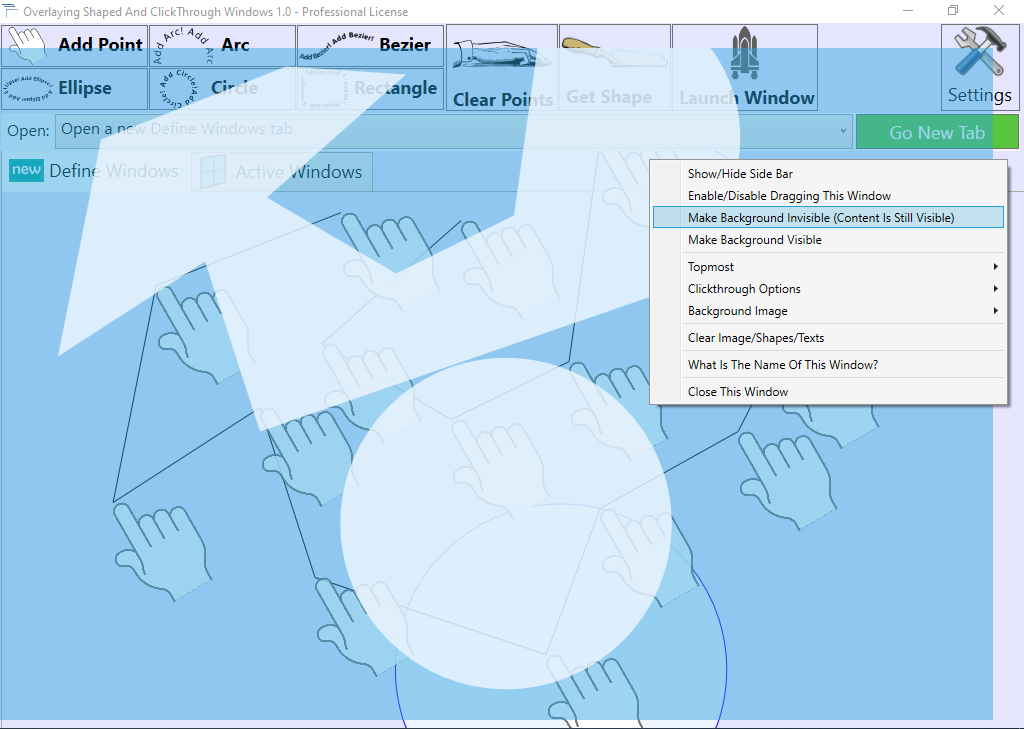
So add at least three points to the canvas, (don’t click Get Shape yet) then click the Launch Window button at the top, then right click the launched window anywhere and select the Make Background Invisible (Content Is Still Visible) menu option, that will create a window under the form of that shape. Cool, right? This is described in Case 1 below.
There are two important cases when creating shapes:
Case 1: you can add the points to the canvas but you do not yet press the Get Shape button. When you launch the window, the shape created by those points will be included in the background of the launched window AS A SHAPE meaning that if you make that background invisible (notice the Make Background Invisible (Content Is Still Visible) menu option) then the window will appear under the form of that shape. DEPENDING ON YOUR NEEDS YOU MAY FIND THIS VERY USEFUL AND MAY ALSO FIND YOURSELF DOING THIS A LOT BECAUSE THAT SHAPE FUNCTIONS AS A HANDLE (IT WILL BE THE BACKGROUND) FOR THAT WINDOW ALLOWING DRAGGING, ROTATION AND RESIZING OF THAT WINDOW. WITHOUT A BACKGROUND, IN ORDER TO CONTROL THAT WINDOW YOU WOULD HAVE TO USE THE SIDEBAR OF THAT WINDOW OR THE SIDEBAR OF THE ACTIVE WINDOWS TAB.
Case 2: you can add the points to the canvas and you do press the Get Shape Button, that will simply create a shape in the canvas of the Define Windows tab. Those shapes (along with any other images, texts you add in that Define Windows tab) will be duplicated in the newly created/launched window when you click the Launch Window button.
Then imagine again being able to create windows with rounded corners having the corner radius up to 2000 pixels. You can create entirely round windows only by playing with the corner radiuses. This is of course in addition of being able to create round windows based on your own created shapes.
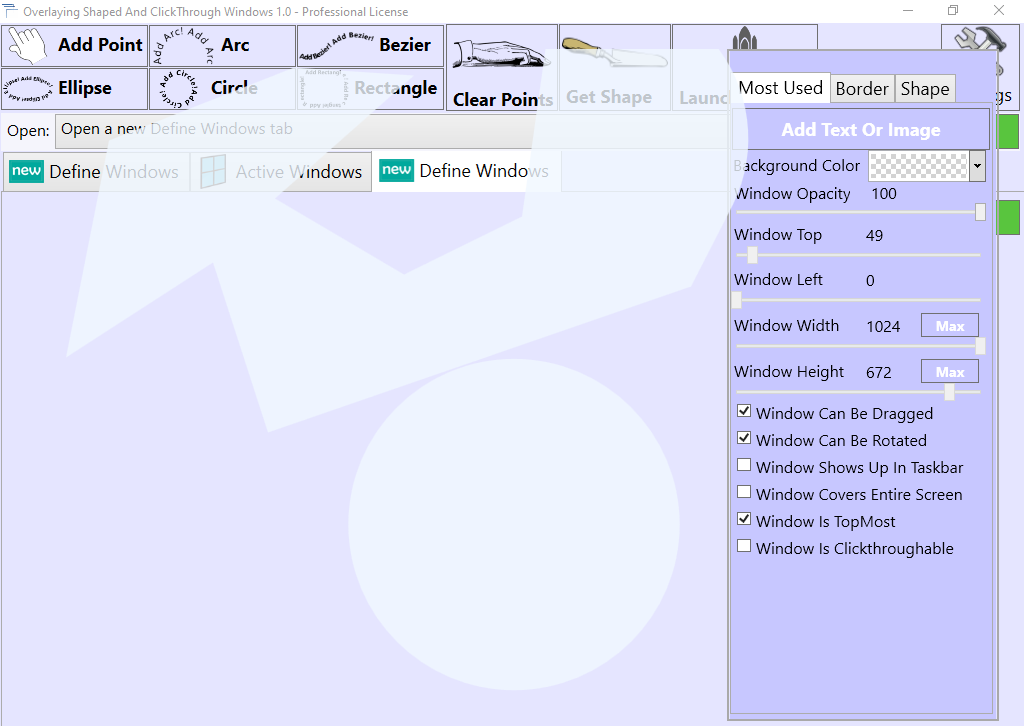
To control the border properties of a window, notice the Border tab in the sidebar of the Define Windows and Active Windows tabs.
The Active Windows tab has the same side bar attached to it, same one as for Define Windows because you can actually use that side bar in the Active Windows tab to specify properties of active/launched windows (just select any of the active/launched windows from the list of active windows in the Active Windows tab and use the sidebar to modify its properties). It’s just another way to control a window’s properties. You can of course modify an active / launched windows properties from the side bar of that window, notice the “Show SideBar” menu option when you right click the window after it has been launched.
Using this application you can do the following:
create overlaying, shaped and clickthrough windows
create transparent windows overlaying them one on top of the other
create windows based on your own created shapes
create shapes from lines, arc, ellipses, circles, rectangles or Bezier curves
build a window entirely from an image with transparency (car, tree, planet, etc) launch the window and see only that object (be it a car, tree, planet) with preserved transparency
build windows using border width, border padding and border corner radiuses
drag, rotate and resize windows
specify whether the created/launched windows are showing up or not in the Taskbar
specify whether the created/launched windows are Topmost or not
specify whether the created/launched windows are clickthrough-able or not
add images (just drop them on the canvas)
edit those images so that only the text will be shown instead of the image. Or you can show both the image and the text. When you edit the text associated to the image, you can set several properties for that text such as text color, text size, text weight (such as Bold) and the font family
aside from working with texts, you can also work with any number of images on the canvas by resizing, rotating, duplicating, deleting and changing the opacity of those images. This way you could create a final image from multiple individual images
select any image and filter it using 94 filter variations
create a path made of points for which you can then get the coordinates
You can define shapes using one of the following:
points
arcs
circles
ellipses
rectangles
beziers
Notice the buttons below which you can find in the top left menu of the application window
To start defining a window, click on the Define Windows tab, set the properties of that window using the sidebar to the right. While defining it, you can also can create shapes using the top buttons, add images to the canvas and edit those images and then when you are done defining the window you can press the Launch Window button from the top menu. That will create a window having the characteristics you defined in the Define Windows tab.
While defining the window you may want to add an image to the canvas (in the Define Windows tab), here are the functionalities you can do on the added image in that tab:
duplicate that image just by double clicking it. The actual points/hands cannot be duplicated.
resizing that image by pressing one of the CTRL keys and then grabbing the image with the mouse and dragging the mouse, as you drag the mouse, the size of the image will be updated based on the direction of where the mouse is moving.
rotating that image by pressing one of the SHIFT keys and then clicking the image. If you press the LEFT SHIFT key and click the image, the image will rotate to the left. Similarly, if you press the RIGHT SHIFT key and click the image, the image will rotate to the right.
filtering the image using several image filters. Notice the Quick Filters menu option when you right click the image.
change the opacity of the image by pressing LEFT CTRL key + A (lowers opacity of the selected image) or LEFT CTRL key + Q (increases opacity of the selected image).
moving the image using the: W, A, S, D key (before moving the image using these keys, you have to click on the image first, to select it).
deleting the image just by pressing the DEL button on your keyboard.
After you have launched a window, you can still set its properties using that window’s side bar and you can still add images and texts to it and even a background image. You can still add items to that window and set its properties just like you did in the Define Windows tab, except now you’re doing it while the window is launched.
The Settings section (notice the top Settings button) allows:
specifying the opacity of the points which will appear in newly opened tabs.
choosing the hand for the points when adding new points to the canvas.
choosing the degrees used to rotate the windows and the images, texts and shapes in those windows.
whether the associated image is shown when creating a shape.
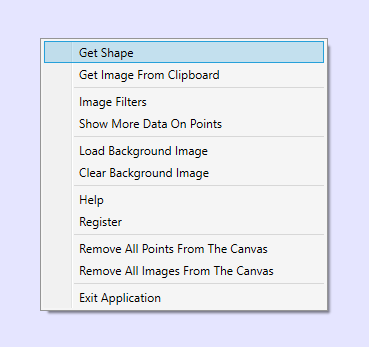
Right clicking on the main canvas in the Define Windows tab:
This provides a context menu with the following options, we will enumerate here the most important ones:
1. Get Shape
This creates a new shape and adds it on the canvas (of the Define Windows tab).
2. New Image From Clipboard
This creates a new movable image on the main canvas based on the image from the Clipboard. Here is an example of a use case: you could copy an image from another application to the Clipboard and then you can paste it (using this menu option) into the working area. When you launch the window, this image will be duplicated / copied into the launched window on exactly the same position it was in the Define Windows tab.
3. Show More Data On Points
This option shows/hides more information on top of each point, specifically it shows the coordinates of the point: x and y, it shows the order of the point (order in which the point was added to the canvas/working area) and the type of the point: LINE, ARC, BEZIER, CIRCLE, ELLIPSE, RECTANGLE.
4. Help
Shows this help window.
5. Register
Shows the registration window allowing you to go to the purchase page to purchase a license to register the product.
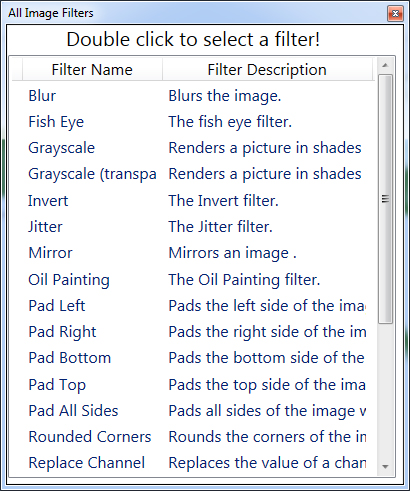
Image Filters Window
When you right click the canvas/working area you can select the 'Image Filter' option which will open the window with the available Color filters. When you double click one of the filters, the associated window of that filter will open (the window will contain any available parameters and the Apply button). The filter will work on the last clicked image on the canvas/working area.
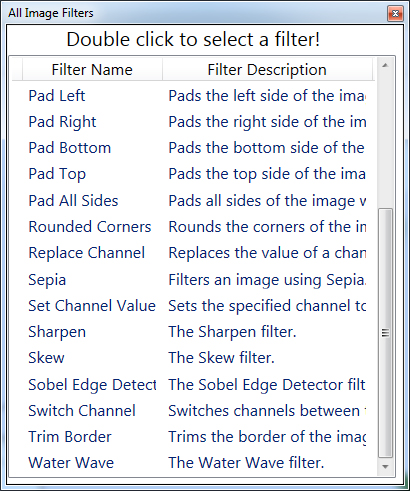
Here are the available Color filters: Blur, Fish Eye, Grayscale, Grayscale (transparency), Invert, Jitter, Mirror, Oil Painting, Pad Left, Pad Right, Pad Bottom, Pad Top, Pad All Sides, Rounded Corners, Replace Channel, Set Channel Value, Sharpen, Skew, Sobel Edge Detector, Switch Channel, Trim Border, Water Wave.
Image Filters With Preview Window
You can right click any image and select the 'Image Filters With Preview' option to filter the selected image using 94 filter variations. You can then click on any of those filtered images (filter variations) and the filtered image will be transferred to the initial image, the one on the canvas on which you right clicked initially.
Each filter in the Image Filter Window has a description attached to it, so that you know how that image was filtered. The filter description appears as you hover over the filtered image.
Shortcuts:
Double clicking the image will duplicate it. The points/hands cannot be duplicated you can only add new points/hands using the buttons at the top.
LEFT CTRL + Grab image and drag it. This will resize the image in the direction of where the mouse is moving.
RIGHT CTRL + Grab image and drag it. This will resize the image in the direction of where the mouse is moving.
LEFT SHIFT + Click the image. This will rotate the image to the left.
RIGHT SHIFT + Click the image. This will rotate the image to the right.
DEL key. This will delete the last selected image.
LEFT CTRL key + A (lowers opacity of the selected image).
LEFT CTRL key + Q (increases opacity of the selected image).
LEFT CTRL key + B key. This switches the visibility (shows or hides) the border of the selected image. If the image has its border shown and this key combination is called then the border will be hidden, similarly if the border is hidden and this key combination is called, then the border will be made visible.
LEFT CTRL key + LEFT SHIFT KEY + B key. This shows or hides the border of all image on the canvas depending on the current visibility of the border of each image.
LEFT CTRL key + ENTER key. This restores the initial/original width and height of the selected image. It is possible the selected image was resized and now you may want to see it at its original size.
RIGHT CTRL key + ENTER key. Restores the initial / original width and height of the selected image.
LEFT CTRL + V key. This pastes the image from the Clipboard into the canvas/working area by creating a new movable image based on the Clipboard image.
LEFT CTRL + C key. This copies the image from the selected movable image control into the Clipboard. You could then paste this into another tab to build up on that image.
LEFT CTRL key + N key. Start a new Define Windows tab.
LEFT CTRL key + F4 key. Closes the current tab. The first tab is never closed. The first two tabs: Define Windows and Active Windows cannot be closed.
Other things to consider:
1. When deleting points: some paths are defined by multiple points and we could have for example a circle which is defined by two points, one for the center and one for the radius. When one of those points is deleted (using the Del key), the associated point of that circle is also deleted. Similarly this happens for an ellipse (which needs 3 points), for a rectangle (which needs 3 points) and for a Bezier curve (which needs 3 points). If you delete the point which is part of a shape and you delete it via right click the point and select “Delete”, only that point is deleted and not all the other points which make that shape.
2. When defining a path, you can have multiple instances of any of the following: POINT, ARC, BEZIER, ELLIPSE, CIRCLE, RECTANGLE. This allows creating pretty much any shape you can think of.
3. When working with ARCs: the sidebar has the Shape tab with two sliders which affect the RadiusX and RadiusY of the last selected ARC. So in order to use those sliders with any of the existing arcs, you must first click on the ARC for which you want to modify the RadiusX and RadiusY.
4. In the side bar there is the Shape tab and it contains the following properties which apply to an arc: Clockwise, Is Large Arc and Rotation Angle.
5. When copying the image to the Clipboard and then you paste it into another tab within this application, the transparency of the image is kept. However when you copy the image to the Clipboard and paste it into another application, the transparency of the image is not kept, but you could save it to the file as a PNG (which preserves transparency) and then you could load it into the application in which you want to process it further.
6. Once a shape is created, it cannot be resized. The resizing functionality applies to the image associated to that shape. To see the image associated to the shape, right click the shape and choose Image Options -> Show/Hide Image.
Registered versus un-Registered
Please purchase a license and register the application to be able to use all the features of the application:
full window rotation and full image/text rotation
any number of active windows at a time (maximum 2 active windows in the trial version)
unlimited number of shapes (maximum 2 shapes per Define Window tab in the trial version)
unlimited distances between 2 consecutive points defining a shape (trial version allows up to 200 pixels)
any number of points to define a shape (maximum four points per shape in the trial version)
any number of images and points on the canvas at a time (max 4 points and 10 images in the trial version)
unlimited width/height per image or text (200/200 max size for image or text added to the canvas in the trial version)
copying the actual image from the canvas (trial version shows: Please Register! on the image)
up to 100 pixels for border width and border padding if you need more let us know (trial version has 15 pixels)
up to to 2000 pixels for border corner radius if you need more let us know (trial version has 15 pixels)
the ability to load an image as the background for the window (trial version doesn't allow this)
work with multiple Define Windows tabs
use CLICKTHROUGH functionality for any active window (trial version doesn't allow using CLICKTHROUGH functionality)
 Overlaying Shaped And Clickthrough Windows